2. Feed Analysis
Laboratory safety
1. Always wear proper personal protection equipment (PPE) for the task you are carrying out (e.g. lab coat or coveralls, safety glasses or prescription glasses with side shields, gloves, face shield, respirator, aspirator, ear buds, etc.); see below for further details
| [16] | Zaklouta M., Hilali M., Nefzaoui A. and Haylani M. 2011. Animal nutrition and product quality laboratory manual. ICARDA, Aleppo, Syria. viii + 92 pp. |
[16]
.
2. Always know the hazardous properties of materials being use
3. Always wash hands thoroughly before leaving the laboratory
4. Never smoke in the building
5. Never eat, drink, store food or apply cosmetics in laboratories
6. Never perform unauthorized experiments
7. Never engage in pranks, practical jokes or other acts of mischief
8. Do not block access to emergency exits and emergency equipment
9. Cell phones should not be used in the laboratory as they may become contaminated.
10. Headphones are not allowed in the laboratory as they interfere with communication.
11. Mouth pipetting is prohibited. Always attach and use a rubber suction bulb for transferring the solution if using a pipette, or use a mechanical pipetting device.
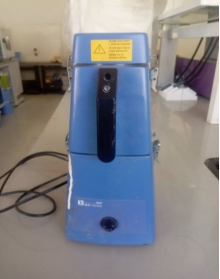
Sample Preparation
The process of preparing samples ensures that they are uniformly prepared for all of the nutritional analyses. The two most important processes are drying and grinding. The preparation of the sample is done in accordance with the requested analyses and sample type. Samples that are wet upon receipt are dried overnight at 60 °C in an air-circulation oven to produce air-dried samples that are prepared for grinding. Using a grinding machine, feed samples are ground to a particle size of 1 mm. Samples that have been dried and ground are kept sealed and out of direct sunlight. To prevent insect damage, caution must be used
| [11] | El Hag, M. G., & SUDAN, K. N. (2022). Laboratory–Manual for Animal Feedstuffs Analysis and Nutritional Evaluation Techniques. |
[11]
.
Figure 1. Grinding Machine.
Processing of Sample
The sample received in the laboratory is the first to be labelled. Each packet of sample should contain the following information.
1. Name of sample
2. Code number of sample
3. Date of procurement
4. Date of sampling
5. Batch number in case of processed feeds
6. Signature with date
2.1. Determination of Moisture in Feedstuffs
The amount of free water that is present in any feedstock is referred to as moisture. Any feedstock sample can be kept free of moisture by placing it in an oven. "Dry Matter" refers to the amount that is left over after this process
| [1] | AOAC (Association of Official Analytical Chemists). 1995. Animal Feed: Sample preparation (950.02). Official methods of analysis, 16th edition. |
| [3] | AOAC (Association of Official Analytical Chemists). 1995. Fat (Crude) or Ether Extract in Animal Feed (920.39). Official methods of analysis, 16th Edition. |
[1, 3]
.
2.1.1. Apparatus and Equipment
1. Metal Tong
2. Heat resistant gloves
3. Spatula
4. Permanent markers
5. Hot air oven
6. Petri-dish
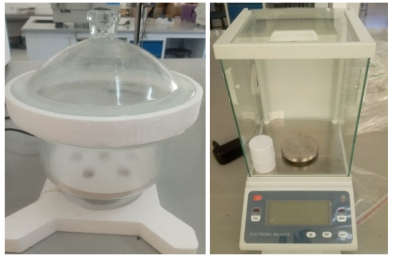
7. Desiccators
8. Balance machine
Figure 2. Balance machine and Dissector.
Figure 3. Heat sensitive glove, spatula, and metal tong.
Figure 4. Hot air oven and Petri-dish.
2.1.2. Procedure
Step 1. Petri-dish Preparation
Place the clean glass petri-dish (120 mm in diameter) in oven and dried in 105°C for 20 minutes. Keep the lid opened and separated. Take out the petri-dish from the oven and put into the desiccator to cool.
Step 2. Sample preparation
The petri-dish is ready to use in the analysis of moisture. Calibration status of the balance should check before weighting. Use petri-dish of 120 mm in diameter to take 10 g of sample.
Step 3. Drying on hot air oven
Place the petri-dish with sample inside the hot air oven carefully. Close the door tightly. Set the temperature at 130°C for 2 hr. after 2 hr open and put the petri-dish from oven into desiccator.
Step 4. Final weight
Now take the final weight of the dish containing dried sample. Clean the balance after measuring.
Step 5. Calculation
Ws= weight of sample
W1= weight of dish
W2= weight of dish after drying
2.2. Determination of Dry Matter (DM)
Dry matter is the portion of forages that have been dehydrated. Dry matter content is the foundation for all nutritional analyses. The Animal Oxygen Analysis and Chemistry (AOAC) method for determining the moisture content of animal feed has been modified for the Wollo University Animal Nutrition Laboratory to work differently
| [2] | AOAC (Association of Official Analytical Chemists). 1995. Ash of Animal Feed (942.05). Official methods of analysis, 16th edition. |
| [3] | AOAC (Association of Official Analytical Chemists). 1995. Fat (Crude) or Ether Extract in Animal Feed (920.39). Official methods of analysis, 16th Edition. |
[2, 3]
.
2.2.1. Equipment
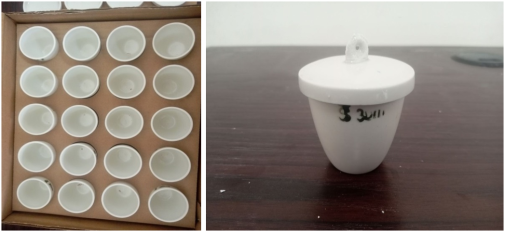
1. Silica crucibles
2. Desiccators
3. Hot air oven
4. Balance machine
Figure 5. Silica crucibles.
2.2.2. Procedure
1. Dried and grinding samples
2. Dry empty crucibles or container overnight at 105°C
3. Cool samples in desiccators to room temperature
4. Measure oven-dry crucible (Wt)
5. Add approximately 2 g of ground sample; record weight (Ws)
6. Dry overnight at 105 °C for 24 hr
7. Allow the desiccators to cool down to room temperature
8. Weight oven dry crucible and sample = (W0)
2.3. Determination of Ash
2.3.1. Equipment
1. Sensitive balance (Figure 2)
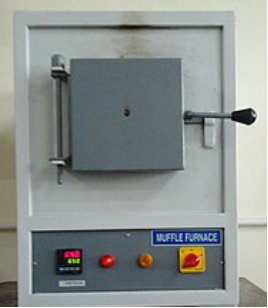
2. Muffle furnace (550°C) (Figure 6)
3. Desiccator (Figure 2)
4. Porcelain or silica crucibles (Figure 5)
Figure 6. Muffle furnace.
2.3.2. Procedure
1. Ignite dry matter samples overnight at 550°C for 2:30 hr in muffle furnace
2. Allow the desiccators to cool down to room temperature
3. Weigh ignited crucible and sample (Wa)
4. Weight oven dry crucible and sample = (W0)
5. Weight oven-dry crucible (Wt)
2.3.3. Precaution
The ash is highly hygroscopic and thus weighing should be done quickly
2.4. Determination of Organic Dry Matter (ODM)
Organic dry matter of feedstuff can be calculated by using the following formula adopted from AOAC
| [4] | AOAC (Association of Official Analytical Chemists). 1995. Fiber (Acid Detergent) and Lignin in Animal Feed (973.18). Official methods of analysis, 16th edition. |
| [5] | AOAC (Association of Official Analytical Chemists). 1995. Moisture in Animal Feed (930.15). Official methods of analysis, 16th edition. |
[4, 5]
.
2.5. Determination of Crude Protein (CP)
It is every nitrogenous substance found in the feedstock sample. True protein and non-true protein (non-protein nitrogen), like urea, are included in it. When it comes to farm animals' nutrition, crude protein is regarded as a significant component. The Kjeldahl method is used to calculate total nitrogen, or crude protein
| [6] | AOAC (Association of Official Analytical Chemists). 1995. Laboratory Safety. Appendix B. Official methods of analysis, 18th edition. |
| [7] | AOAC (Association of Official Analytical Chemists). 1990. Official methods of analysis, 15th edition. Arlington, VA. |
[6, 7]
.
2.5.1. Equipment
1. Digestion rack
2. Balance machine (Figure 2)
3. Spatula (Figure 3)
4. Acid proof glove (Figure 3)
5. Funnel
6. Kjeldahl flask
7. Mixer machine
8. Dropper
9. Pipette
10. Sample shaker
11. Conical flask
12. Volumetric flask
13. Measuring cylinder
14. Hot plate with magnetic stirrer
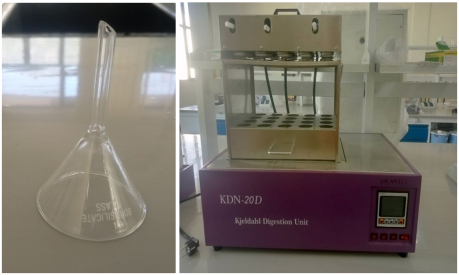
Figure 7. Funnel and Kjeldahl digester unit.
Figure 8. Hot plate with magnetic stirrer and measuring cylinder.
2.5.2. Chemicals/Reagent Preparation
Catalyst (potassium sulphate + copper sulphate + selenium sulphate
KSo4 + CuSo4 + SeO2
Ratio 5 3 1
Procedure
1. Clean everything what you need to prepare the catalyst
2. Use clean and separated spatula for weighting different reagent/chemicals
3. Transfer into same mixer chamber to mix catalysts
4. Close the mixer chamber tightly with lid
5. Mix all the tree chemicals using the mixer machine
6. Sulfuric Acid (concentrated 95-98%)
7. 40% Sodium Hydroxide solution
Procedure
1. Take weight of 40 g of NaOH pellet
2. Transfer the weighted NaOH into the flask and shake slightly to mix
3. Take 80 ml of distilled water into the flask
4. Label the flask with 40% NaOH, the wait too dissolve all the pellets and cool at room temperature
5. After cooling, add water to make the final 100 ml volume
6. 4% Boric Acid solution preparation
Procedure
1. Weight 4 g of boric acid powder
2. Transfer the boric acid powder into 40 ml of some hot distilled water
3. Stir with a clean glass rod to dissolve boric acid well. Tur off the hot plate and cool the boric acid solution
4. Label a 100 ml volumetric flask with 4% boric acid solution
5. Take the cooled boric acid solution into the volumetric flask
6. Add distilled water to volume up to 100 ml, and then rotate the flask to mix 4% of boric acid solution.
7. 0.1 N hydrochloric acid (standardized)
Procedure
Step 1. Phenolphthalein indicator preparation
Dissolve 2 g phenolphthalein indicator powder into 100 ml of ethanol and mix well by shaking
Step 2. Dilute 0.83 ml of HCl (concentrated) with distilled water to make the total volume of 100 ml.
1. Label a 100 ml volumetric flask with 0.1 N HCl
2. Drop 80 ml of distilled water into 100 ml volumetric flask
3. Pipette 0.83 ml of concentrated HCl (37%) into the flask
4. Add distilled water enough to make 100 ml of the final volume
5. Shake the flask to mix the HCl with distilled water
Step 3. Standardized newly prepared 0.1 N HCl with standard 0.1 N NaOH solution and find the actual normality.
1. Take 0.1 N standard NaOH solution into burette
2. Take the initial burette reading
3. Measure 20 ml of newly prepared HCl solution and take into conical flask
4. Add 3-4 drops of phenolphthalein indicator into conical flask
5. Titrate it with standard 0.1 NaOH solution
6. Take final burette reading after the color changed
Step 4. Calculation for standardization of 0.1 N HCl
1. Burette reading of NaOH (V2)
2. Normality of NaOH (N2)
3. Volume of prepared HCl (V1)
4. Normality of HCl (N1)
Rewrite the actual normality of HCl from the calculation of standardization
Methyl Red Indicator
Dissolve 100 mg Methyl red indicator powder into 100 ml of methanol and mix well by shaking
Determination of total nitrogen (crude protein) using the Kjeldahl method
2.5.3. Procedures
1. Digestion
(1) Label the kjeldahls flask with the sample number
(2) Take the weighted sample into the flask
(3) Again, weight 3 g of catalyst
(4) Take the catalyst into the flask to mix sample
(5) Take 20 ml of concentrated H2SO4 and pour the acid into the sample flask
(6) Shake the flask gently to mix the acid with sample and catalyst
(7) Place the flask on digestion unit carefully
(8) Turn on the digester power and set the temperature at 230°C and water circulation open
(9) After 2 hr clean green color solution indicates the end of digestion
(10) Turn off the digester and wait to cool the flask
(11) Now, the digested sample diluted with distilled water
(12) Add 20 ml of distilled water into the flask, mix and pour the digested sample into 100 ml volumetric flask
(13) Add enough water to make the final volume of 100 ml
2. Distillation
(1) Measure 30 ml of 4% boric acid and pour into a conical flask
(2) Place the flask on the distillate collection unit
(3) Take 10 ml of digested sample to transfer into distillation flask
(4) Now, add 50 ml of 40% NaOH
(5) Add another 50 ml of distilled water
(6) Run the distillation at 200°C for 1 hr
(7) Turn off the distillation after collect approximately 100 ml of distillated
3. Titration
(1) Take 0.1 N HCl into burette
(2) Note the initial burette reading
(3) Add few drops of methyl red indicator into the conical flask and mix well
(4) Start titration-adding 0.1 N HCl
(5) Place a white background at bottom of the flask to transparence colors
(6) Start titration adding 0.1 N HCl
(7) Stop the titration if the color is changed into orange
(8) Note final reading of burette
4. Calculation
Finally calculate nitrogen and crude protein
Where,
V1= Volume of 0.1 N HCl (final burette reading –initial burette reading)
n1= Normality of HCl
F1= Acid factor
F2= Dilution Factor
Mwn=Molecular weight of nitrogen =14.007
2.6. Determination of Crude fat or Ether Extract (EE)
Crude fat or ether is estimated by extracting the feed sample using continues evaporation and condensation of fat solvent like petroleum ether, diethyl ether, benzene, hexane etc. In special made extraction apparatus, that is soxhlate apparatus. Lipids are a group of materials that are insoluble in water but soluble in ether, chloroform, and benzene. The ether extraction procedure itself is quite simple and usually involves a reflux apparatus in which the ether is boiled, condensed, and allowed to pass through the feed sample
| [8] | AOAC (Association of Official Analytical Chemists). 2000. AOAC Official Method 970.26. Official methods of analysis, 17th edition. |
| [9] | AOAC (Association of Official Analytical Chemists). 2000. AOAC Official Method 972.16. Official methods of analysis, 17th edition. Gaithersburg, MD, USA. |
| [10] | AOAC (Association of Official Analytical Chemists). 2000. Official Method 947.05. Official methods of analysis, 17th edition. Gaithersburg, MD, USA. |
[8-10]
.
2.6.1. Apparatus and Equipment
(1) Soxhlet apparatus
(2) Soxhlet extractor
(3) Filter paper
(4) Measuring cylinder (Figure 8)
(5) Thimbles
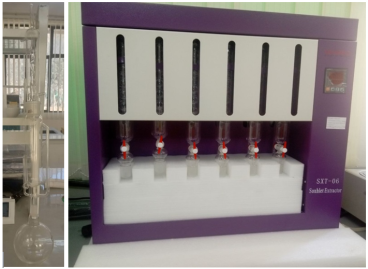
Figure 9. Soxhlet appatus and extractor.
2.6.2. Chemical/Reagent
n-hexane 95%
2.6.3. Procedure
Step 1. Thimble Preparation
(1) Gather everything you need to make a thimble with filter paper
(2) Make a thimble with filter paper
(3) Place the thimble on balance machine
(4) Take weight of a thimbles
Step 2. Sample Preparation
(1) Grind the sample if it is solid
(2) Put about 4.5 g of sample into the thimble.
(3) Take note weight of the sample
(4) Place small amount of cotton into thimble in a way that covers the sample
(5) Fold the thimble to enclose the sample
(6) Take a cellulose thimble (sample holder)
(7) Label the thimble contain sample with sample number and put inside the cellulose thimble
(8) Take a cleaned and dried flat bottom flask
(9) Take a weight of the flask placing in a balance machine
Step 3. Fat extraction
(1) Set up soxhlet extraction unit placing the sample in it
(2) Add sufficient amount of n-hexane
(3) Run the water through the condenser of soxhlet extractor
(4) Turn on the power and active for 6 hr
(5) Take out the sample from thimble
(6) Rotate the flask to evaporate the excess n-hexane
Step 4. Taking final weight
(1) Place the flask inside the oven to remove moisture and hexane
(2) Set the temperature at 110°C for 30 minutes
(3) Take out the dried flask and place in desiccator to cool for 20 minutes
(4) Measure the final weight of flask after cooling
Step 5. Calculation
Where
W1= weight of flask
W2= weight of flask and fat
Ws= weight of sample
2.7. Determination of Crude fiber (CF)
Crude fiber describes the plant cell wall components (including cellulose, hemicellulose, lignin), which are not digestible, and thus the portion of the feed that is not energetically usable by animals. The value of CF was analyzed according to
| [15] | Van Soest, P. J. 1975. Physio-chemical aspects of fibre digestion. In: I. W. McDonald, and AC. I. Warner (Ed.), Digestion and Metabolism in the Ruminant. The Univ. New England Publ. Unit, Armidale, Australia. |
[15]
.
2.7.1. Reagents
(1) Sulfuric acid solution, 0.255N, 1.25 g of H2SO4/100 mL
(2) Sodium hydroxide solution, 0.313 N, 1.25 g of NaOH/100 mL, free of Na2CO3 (concentrations of these solutions must be checked by titration)
(3) Alcohol - Methanol, isopropyl alcohol, 95% ethanol, reagent ethanol
(4) Bumping chips or granules - antifoam agent (decaling)
2.7.2. Apparatus
(1) Digestion apparatus
(2) Ashing dishes
(3) Desiccator
(4) Filtering device
(5) Suction filter: to accommodate filtering devices. Attach suction flask to trap in line with aspirator or other source of vacuum with valve to break vacuum.
2.8. Determination of NFE (Nitrogen Free Extract)
Nitrogen free extract (NFE) represents the soluble carbohydrate fraction of the feed. In the Weende’s system of analysis, NFE is not estimated but calculated
| [15] | Van Soest, P. J. 1975. Physio-chemical aspects of fibre digestion. In: I. W. McDonald, and AC. I. Warner (Ed.), Digestion and Metabolism in the Ruminant. The Univ. New England Publ. Unit, Armidale, Australia. |
[15]
.
NFE on as feed basis = 100 – (Moisture+ Crude protein +Ether extract + Crude fiber + Total ash)
NFE on dry matter basis = 100 – (Crude protein + Ether extract + Crude fiber + Total ash)
4. Physical Evaluation of Feedstuffs
Feedstuffs must be physically inspected in order to be evaluated for quality and suitability for use in animal diets. Examining the feed's color, texture, odor, foreign material content, and mold contamination are all part of this assessment. Physical evaluation of feed is a quick, practical method to assess feed quality based on visible characteristics such as color, texture, odor, and the presence of foreign material or mold
| [16] | Zaklouta M., Hilali M., Nefzaoui A. and Haylani M. 2011. Animal nutrition and product quality laboratory manual. ICARDA, Aleppo, Syria. viii + 92 pp. |
[16]
. These attributes can reveal essential information about the freshness, safety, and potential nutrient value of the feed. For instance, a green color in forages often indicates higher nutritional content, while a musty odor or dark coloration may signal spoilage or mold contamination, which can be harmful to livestock. Evaluating texture and particle size also helps determine digestibility, especially in ruminants. This initial, hands-on assessment is crucial for selecting feeds that are safe and beneficial, ensuring they meet animals’ dietary needs.
1. Color
A feedstuff's color can reveal information about its nutritional value, maturity, and freshness. A rich nutrient profile is suggested by green forage, which has a higher chlorophyll content, whereas oxidation or spoiling may be indicated by a brown or dark color. A vibrant green color in forages, such as grass or alfalfa, typically indicates a high content of chlorophyll, which is linked to essential nutrients like protein, vitamins (e.g., Vitamin A), and minerals. Young, tender plants tend to have a richer green color. This stage is associated with higher digestibility and better nutrient profiles. As plants mature, their color may fade or yellow due to increased lignification (fibrous, less digestible material). Freshly harvested or properly stored forages retain a bright green color. Any deviation suggests deterioration or prolonged storage. Forages that appear pale yellow often indicate that they were harvested too late when the plant had matured excessively. This is associated with higher fiber content, lower protein, and reduced digestibility. Excessive sun exposure during drying can bleach green feed to a yellowish tint, indicating a loss of some nutrients (e.g., Vitamin A precursors). For hay, some yellowing is natural due to drying but may also signal improper curing or prolonged storage.
Oxidation of nutrients (e.g., fats or chlorophyll) during storage or improper drying can result in browning. Oxidized feed has a reduced nutritional value and may lose palatability. A brown or blackened color often indicates heat damage or spoilage. This can occur when moisture remains in stored feed, leading to microbial activity and mold development. Silage with a dark color may indicate excessive fermentation or overheating during ensiling, potentially leading to the formation of undesirable compounds likes butyric acid. These colors indicate mold growth, which can contaminate feed with toxins (mycotoxins). Even small patches of discoloration from mold may signal broader spoilage in the feed. Color is a quick and practical indicator that farmers and feed evaluators can use to assess the quality of feed without complex tools. It reflects the feed condition, whether it is safe, nutritious, and palatable for animals. Monitoring color changes can help prevent nutritional deficiencies, reduced feed intake and health risks from spoiled or contaminated feed.
2. Texture
Texture is related to the feed's physical consistency and particle size. Coarse forages might be harder to digest than finer ones, and excessively dusty feed might make animals eat less. For ruminants, texture is particularly crucial because digestion and rumination are impacted by particle size. The texture of feed refers to its structural characteristics, such as hardness, softness, coarseness, or fineness. These attributes significantly influence its palatability, digestibility, and intake. Forages with large, tough particles may be difficult to chew and digest. Overly coarse materials, like un-chopped crop residues, can reduce feed efficiency and animal performance due to longer rumination times and slower digestion. Finer-textured feed can enhance digestibility by increasing surface area for microbial activity in the rumen. However, excessively fine or powdered feed may reduce intake because it can irritate the animal’s respiratory tract or form clumps in the feed trough. The texture of feed plays a critical role in the overall success of a feeding program by influencing have proper texture encourages consumption, balanced particle sizes improve microbial breakdown in the rumen, dusty or poorly textured feed can lead to respiratory and digestive issues. Farmers should aim for a texture that is well suited to the specific needs of the livestock being fed. For ruminants, ensuring a balance between coarse and fine particles (e.g., 1-2 cm in length for chopped forage) can optimize rumination and digestion.
3. Odor
High-quality feed usually has a pleasant, fresh smell, whereas musty or sour smells could be signs of fermentation, mold growth, or spoiling. Additionally, odor can be used to identify problems such as fermentation in silage or rancidity in fats. Odor is one of the most immediate and reliable indicators of feed quality. It provides clues about the feed's freshness, safety, and nutritional integrity, allowing early detection of potential problems that could influence animal health and performance.
The characteristics of odor for high quality feed, whether it is hay, silage, or concentrate, typically emit a natural and fresh aroma. Fresh hay has a sweet, grassy scent, indicating proper drying and preservation. Properly fermented silage has a clean, slightly acidic smell, which is indicative of lactic acid production. Feeds like grains and pellets should smell neutral to mildly sweet. Musty odors signal mold growth, typically caused by high moisture levels during storage. Moldy feed can produce mycotoxins, which are harmful to animals, reducing performance and potentially causing serious illnesses. Even subtle musty smells should not be ignored, as they often indicate contamination that may not yet be visually apparent.
A strong sour odor suggests undesirable fermentation caused by improper ensiling, heating, or prolonged storage in damp conditions. For silage, excessively sour or vinegary smells may indicate the presence of unwanted acids like butyric acid, resulting from clostridia fermentation. This compromises silage quality and reduces palatability. Feeds containing fats or oils, such as oilseeds or concentrate mixes, may develop a rancid odor due to oxidation of lipids. Rancidity reduces the energy value of the feed and may result in animals rejecting it. Rancid fats can also lead to oxidative stress in animals, affecting their overall health and production efficiency. Putrid odors, resembling decaying organic matter, indicate severe spoilage caused by bacterial or fungal contamination. This is common in feed that has been poorly stored or left exposed to moisture and heat. Such feed is unsafe for consumption.
A pleasant, slightly tangy smell suggests good fermentation (lactic acid). However, strong sour (acetic acid) or putrid odors point to improper fermentation and spoilage. A soapy or rancid smell in oil-rich feeds indicates oxidation. Musty or earthy odors in grains often signal mold or fungal contamination. Animals are sensitive to odors. Feed with unpleasant smells (e.g., sour or musty) is less likely to be consumed, even if the nutritional content remains intact. Odor can reveal potential hazards like mycotoxins, rancidity, or spoilage, which may not be immediately visible. Identifying and removing such feed prevents health issues, such as reduced immunity, digestive disorders, or toxicity. A pleasant odor often reflects proper storage, while off-odors indicate that corrective measures are needed in the storage or processing system.
4. Presence of Foreign Material
Physical evaluation entails locating any non-feed material that could be dangerous and lower the quality of the feed, such as rocks, soil, plastic, or weeds. Eliminating foreign objects is crucial to protecting animals from possible harm. Foreign material in feed refers to non-feed substances that may inadvertently contaminate it during harvesting, processing, transportation, or storage. These materials not only reduce the feed's quality and safety but can also pose significant risks to animal health and productivity. There are different types of foreign material found in feeds for instance rocks and stones, soil and sand, plastic, metal fragments, plant debris and weeds. These can damage feed processing equipment and pose a choking or injury risk to animals. Common contaminants, especially in crop residues or ground-stored feeds, which dilute the nutritional value and cause wear on teeth or digestive discomfort. Pieces of packaging, bags, or silage wrap are harmful if ingested, potentially leading to blockages in the digestive tract. Nails, wires, or shards from machinery can cause severe injuries, such as punctures or lacerations in the digestive system. Broken glass poses a significant risk of internal injuries if consumed. Some weeds are unpalatable or toxic to animals. They can also increase competition for nutrients, reducing feed quality. While intentional inclusion of residues can be beneficial, excessive unprocessed debris, like husks or stems, can reduce palatability and digestibility. Eliminating foreign materials is essential to maintaining the safety, palatability, and nutritional quality of feed. Regular inspections, proper storage, and cautious handling are vital to preventing contamination and protecting livestock from harm.
5. Mold and Fungal Growth
Feed containing mold has the potential to be hazardous. Mold and fungal contamination in feed is a significant concern, as it not only reduces nutritional value and palatability but can also pose serious risks to animal health. Moldy feed is often associated with the presence of mycotoxins, toxic compounds produced by certain fungi, which can cause a variety of health and production issues. There are different causes of mold and fungal growth in feed. Feeds with excess moisture (above 15-20%) provide a conducive environment for mold development. This is common in improperly dried hay, silage, or grains. Mold thrives in warm, humid conditions. Feed stored in damp or poorly ventilated areas is at a higher risk of fungal contamination. Physical damage to crops during harvesting or improper ensiling can create conditions favorable for fungal growth. Storing feed for extended periods without proper drying or treatment can lead to spoilage and mold formation.
There was a health risk associated of mold growth in feeds. Moldy feed is often unpalatable, causing animals to reduce intake and leading to lower productivity. Certain molds, such as Aspergillus, Fusarium, and Penicillium, produce mycotoxins that can harm animals even in small quantities. Common mycotoxins include aflatoxins, fumonisins, zearalenone, and deoxynivalenol (DON). Dust from moldy feed can irritate the respiratory tract of animals, leading to coughing, labored breathing, or allergic reactions. Severe contamination or prolonged exposure to moldy feed can cause acute toxicity, organ damage, and death. Feed with visible mold or a musty odor should be treated as potentially hazardous. Preventing mold growth through proper storage, moisture management, and regular monitoring is essential for maintaining feed quality and protecting animal health.